
Written by the Nail Health Guide Editorial Team Reviewed under the editorial direction of Laura Collins, Editorial Lead. Content is based on nail health research, publicly available dermatology references, and real-world user experiences.
If your toenail looks white, dry, and crumbly — almost like chalk or powder — you’re likely dealing with a specific presentation of toenail fungus that’s worth understanding before you treat it.
Not all white toenail fungus looks the same. The chalky, crumbling variety behaves differently from a simple white spot, responds differently to treatment, and carries different risks if ignored.
This guide explains exactly what causes the chalky appearance, how to tell it from other nail conditions, and what home treatment approaches are most effective for this type.
What Is White Chalky Toenail Fungus?
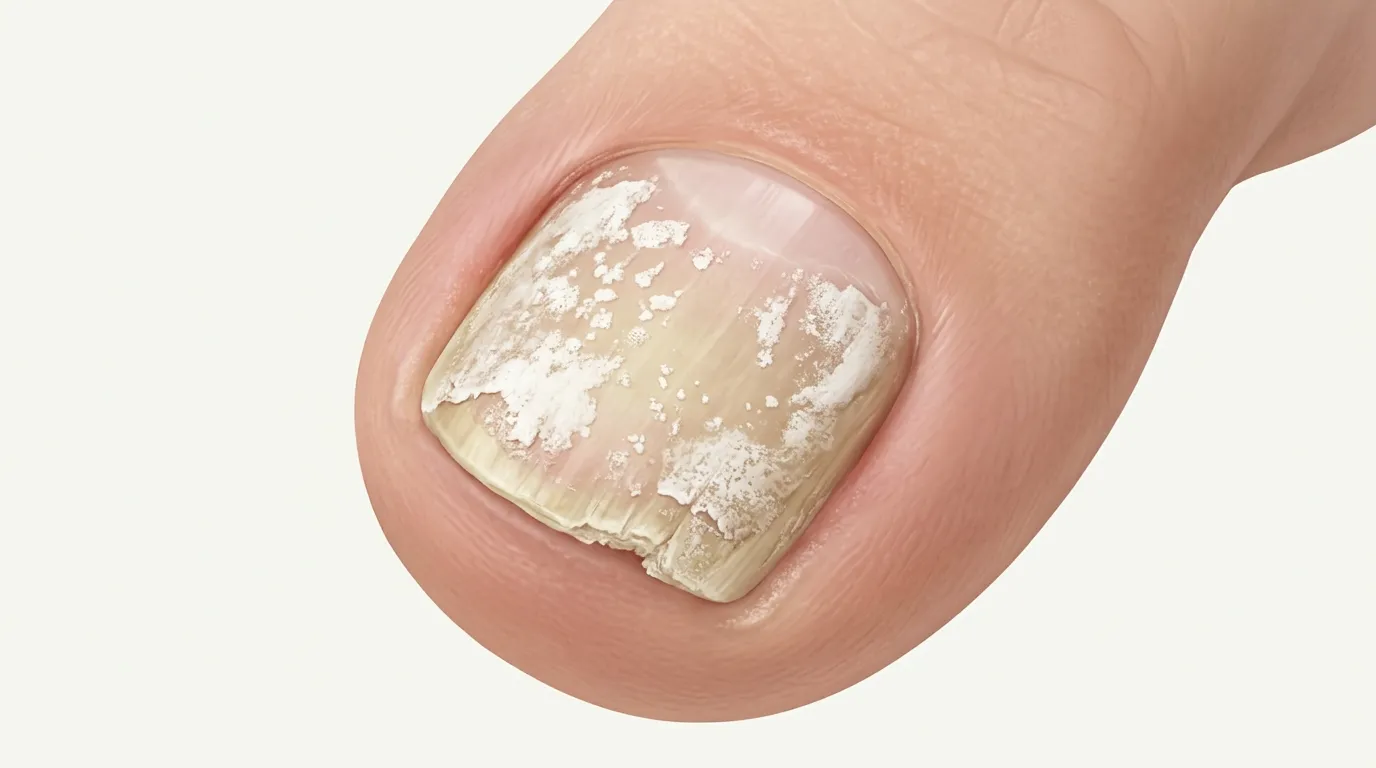
White chalky toenail fungus is a visual presentation of fungal nail infection where the nail surface appears dry, opaque, and crumbly — often with a powdery or chalk-like texture that can flake off when touched or filed.
It most commonly occurs with white superficial onychomycosis (WSO) — a type of infection where the fungus colonizes the outer nail plate rather than penetrating from underneath. The chalky appearance is caused by the fungus breaking down the keratin in the nail, leaving a weakened, porous structure that crumbles rather than maintaining its normal smooth surface.
In some cases, chalky white nails also occur in the later stages of distal subungual onychomycosis (the most common type), when significant nail damage has accumulated and the nail becomes thickened and crumbly throughout.
👉 To understand the full spectrum of how white toenail fungus presents visually: White Toenail Fungus: Causes, Early Signs & How to Tell If It’s Really Fungal
What Does It Look Like?
Chalky white toenail fungus has a distinct appearance that separates it from other causes of nail discoloration.
Visual characteristics:
- Dull, opaque white or off-white color across part or all of the nail
- Dry, powdery, or crumbly texture — the nail surface flakes or breaks rather than bending
- Nail may look almost dusty or matte rather than shiny
- White material comes off when you file or scrape the surface
- The nail underneath the chalky layer may look pitted or uneven
- In advanced cases, the entire nail becomes thick, brittle, and crumbling
Where it appears: Chalky patches typically start in the middle of the nail surface (with WSO type) or spread from the nail tip inward (with distal type). Unlike yellow toenail fungus, which usually starts at the tip and works inward beneath the nail, chalky white fungus tends to affect the nail surface more visibly.
The key distinction — chalky vs stained: Nail polish staining leaves a uniform yellow or white discoloration that sits in the nail but doesn’t crumble. Chalky fungal infection has texture — it flakes, scrapes off in powdery layers, and leaves the nail looking damaged underneath.
👉 For a side-by-side comparison of fungal infection vs nail damage and staining: Toenail Fungus vs Trauma Nail Damage: How to Tell the Difference
What Causes the Chalky Appearance?
The chalky texture isn’t cosmetic — it’s structural damage caused by the fungus.
When fungal organisms colonize the nail plate, they secrete enzymes that break down keratin — the protein that gives nails their strength and smooth surface. As keratin degrades, the nail becomes progressively more porous and brittle. The chalky, crumbling appearance is the visual result of this ongoing keratin breakdown.
Factors that worsen the chalky presentation:
Prolonged nail polish use: Polish traps moisture and prevents the nail from breathing. Combined with the keratin-degrading effects of acetone-based removers, this weakens the nail surface and makes it more vulnerable to fungal colonization.
Repeated mechanical trauma: Tight shoes, running, or repetitive pressure creates micro-damage that the fungus exploits as an entry point.
Chronic moisture exposure: Wet nails are softer and more permeable. People who spend extended time with wet feet — swimmers, healthcare workers, kitchen staff — have higher rates of chalky nail fungus.
Underlying nail conditions: Pre-existing nail damage, psoriasis, or lichen planus can create structural weaknesses that make the chalky presentation more severe.
White Chalky Toenail Fungus vs Other Conditions
Several conditions can produce a chalky or white nail appearance. Accurate identification matters because treatment differs significantly between them.
| Condition | Appearance | Key Difference |
|---|---|---|
| White superficial onychomycosis | Chalky, crumbly surface patches | Scrapes off in powdery layers |
| Nail psoriasis | White/silvery patches, pitting | Often accompanied by skin psoriasis, oil-drop discoloration |
| Keratin granulations | White patches after nail polish removal | Disappears within weeks of leaving nails bare |
| Nail trauma | White discoloration after impact | Grows out with the nail, doesn’t spread |
| Leukonychia | True white nail, smooth surface | Smooth texture, no crumbling |
Keratin granulations are particularly easy to confuse with chalky fungal infection — they appear after prolonged nail polish use and look strikingly similar. The difference: keratin granulations resolve on their own within 2–4 weeks of leaving nails bare and untreated. Fungal infections don’t.
👉 If you’re unsure whether your nail changes are fungal or related to nail psoriasis: Toenail Fungus vs Nail Psoriasis: How to Tell the Difference
Early Signs of Chalky Toenail Fungus
Recognizing the infection before the chalky stage gives you the best treatment outcome.
Before it becomes fully chalky:
- Small dull or opaque patches on an otherwise normal nail
- Slight roughness when you run your finger across the nail surface
- One or two spots that look slightly powdery — easily missed
- Nail loses its normal shine in patches
At the chalky stage:
- Visible white, dry, crumbly areas covering part or all of the nail
- Nail flakes when filed or clipped
- The nail feels thinner and more fragile than normal
- Patches that grow over weeks rather than staying contained
Advanced chalky fungus:
- Extensive crumbling across the nail
- Nail becoming significantly thickened
- Possible lifting from the nail bed
- Other nails beginning to show early signs
👉 For a complete breakdown of early fungal signs across all types: What Does Early Toenail Fungus Look Like?
How to Treat White Chalky Toenail Fungus at Home
Because chalky white fungus typically begins on the nail surface, topical treatments can be highly effective — especially when combined with mechanical preparation.
Step 1: Prepare the Nail (Critical for Treatment Success)
Before applying any antifungal, file down the chalky, crumbly surface material. This does two things:
- Removes fungal load directly from the nail
- Thins the nail surface so the antifungal can penetrate more effectively
Use a fine-grit nail file or emery board. File gently — the goal is to remove the powdery, damaged surface layer, not to damage the nail bed. Do this before every treatment application.
Step 2: Apply Topical Antifungal Consistently
Apply your chosen antifungal directly to the nail surface, nail edges, and under the nail tip if possible.
Effective topical options:
- Ciclopirox (Penlac) — prescription nail lacquer with strong evidence for WSO
- Terbinafine cream — OTC antifungal cream, apply under the nail edges
- Tea tree oil — natural antifungal with research support; apply with a small brush daily
- Undecylenic acid — plant-derived antifungal found in some OTC nail products
- Clotrimazole or miconazole — broad-spectrum antifungals available OTC
The specific product matters less than the consistency. Daily application without skipping is more important than which formula you choose.
Step 3: Keep the Nail Environment Unfavorable for Fungi
- Trim nails short — shorter nails reduce the surface area available for fungal growth
- Keep feet dry — change socks at least once daily, use foot powder if needed
- Avoid nail polish during treatment — it traps moisture and blocks treatment penetration
- Disinfect shoes with antifungal spray or powder to prevent reinfection
Step 4: Monitor Progress
Progress with chalky toenail fungus is visible but slow. What you’re watching for:
- New nail growing at the base that looks smooth and normal
- Chalky patches not expanding further
- Nail becoming less crumbly over time
Expect 3–6 months of consistent treatment before significant visual improvement, and 9–12 months for full nail regrowth.
👉 For the full home treatment protocol with daily routine: How to Treat Toenail Fungus at Home: What Really Works
When Topical Treatment Isn’t Enough
For most cases of white chalky toenail fungus caught at the surface stage, consistent topical treatment works. But there are situations where professional treatment becomes necessary:
- The infection has spread to 3 or more nails
- The chalky damage extends deep into the nail structure with significant thickening
- Three months of consistent topical treatment shows no improvement
- You have diabetes, poor circulation, or immune compromise
- The nail is lifting significantly from the nail bed
In these cases, oral antifungals — terbinafine or itraconazole prescribed by a dermatologist or podiatrist — offer systemic treatment that reaches the infection through the bloodstream rather than through the nail surface.
👉 If treatment doesn’t seem to be working, these are the most common reasons why: Toenail Fungus Not Responding to Treatment? Here’s Why
Preventing Chalky Toenail Fungus
Prevention follows the same logic as treatment — deprive the fungus of its preferred conditions.
Most effective prevention habits:
- Give nails regular breaks from nail polish — at least 1 week off for every 4 weeks of polish use
- Use acetone-free nail polish remover when possible — acetone weakens the nail surface
- Keep nails trimmed short and clean
- Wear moisture-wicking socks and change them daily
- Use flip-flops in communal areas — pools, gyms, locker rooms
- Disinfect nail clippers and files with rubbing alcohol between uses
- Address athlete’s foot immediately — it often precedes nail fungus
FAQ — White Chalky Toenail Fungus
Is chalky toenail fungus the same as regular toenail fungus? It’s the same underlying infection — the chalky appearance is just a specific visual presentation that reflects surface-level keratin breakdown. Treatment approaches are similar, though surface preparation before applying topicals is especially important for chalky nails.
Can chalky nails be caused by nail polish? Yes — but in that case it’s usually keratin granulations, not fungus. The key difference is that keratin granulations resolve on their own within 2–4 weeks of leaving nails bare. If the chalky patches persist after going polish-free, fungus is the more likely cause.
Does chalky toenail fungus spread? Yes. White superficial onychomycosis can spread across the nail surface and to neighboring nails through shared tools and footwear. Treatment prevents spread.
How long does treatment take for chalky toenail fungus? Surface infections can improve within 6–8 weeks of consistent treatment. Full nail regrowth after clearing the infection takes 9–12 months for a big toenail.
Should I remove the chalky material before applying treatment? Yes — filing down the chalky surface before treatment significantly improves how well the antifungal penetrates the nail. This is one of the most important steps people skip.
Final Thoughts
White chalky toenail fungus looks more alarming than a small white spot — but it’s actually catching a surface infection that hasn’t yet penetrated deeply. That makes it more treatable, not less.
The keys to successful treatment are preparation (filing the chalky surface before applying antifungal), consistency (daily application without skipping), and patience (nail regrowth takes months even when treatment is working correctly).
If you’ve noticed the chalky, crumbling texture on your nail, start treatment now rather than waiting. Surface infections that go untreated become deeper infections — and deeper infections take significantly longer to clear.
👉 Start with the home treatment guide: How to Treat Toenail Fungus at Home: What Really Works
👉 Or compare your symptoms with the full visual guide: What Does Toenail Fungus Look Like? Pictures & Early Signs
Reviewed by Laura Collins — Editor & Lead Content Researcher at Nail Health Guide. Laura Collins reviews nail health content using a research-based approach focused on clarity, accuracy, and real-world relevance. Learn more about Laura Collins
⚠️ Medical Disclaimer: This content is for informational purposes only and is not intended as medical advice. Always consult a qualified healthcare professional for diagnosis and treatment guidance.